Wednesday, 30 April 2014

USA Beauty Haul


In the spirit of full disclosure I will admit to you that this is by no means everything I bought in America. It's not even close. I came home with a rather large Sephora bag full to the brim with both drug store and high end goodies (and the stuff wasn't even in its packaging). If I were to haul all of it in this post, not only would I look like a crazy person but this post would be longer than all of the Game of Thrones books combined. Instead I chose five products semi-randomly and thought I would explain the reasoning behind these purchases. 


I know we have these in Australia (at least I'm fairly sure we do) but makeup was so much cheaper in the US that it was worth buying it over there. This Rimmel London Scandaleyes Eyeshadow Stick in the colour Bulletproof Beige was an off the cuff choice in a whirlwind first trip to CVS. Thought it would be a really easy base colour to draw all over my lid as a base and you know what? I was right. 


I figured I couldn't go into Sephora so many times and not try their own brand. I've been wanting a brown liner just to mix things up a bit and I decided to go with the Sephora Contour Eye Pencil in Cappuccino. I swatched this in the shop and thought it was perfect but when I got back to the hotel and tried it I realised that it is shimmery. This did not bother me too much because it's actually really pretty but I did go back and pick up the matte brown I was after in the colour Tirramisu.


The Maybelline Colour Elixir in Petal Plush was another random purchase in my first CVS trip and try as I might I can't remember why I bought it. I'm glad I did though because it became my most worn lip product of the trip, replacing the heaps that I brought from home. I loved it so much that I just had to get another colour before heading home. This one is Fuchsia Flourish.


I may or may not have bought all of the Naked Palettes (hint: I bought them). In my own defence, I was calm about it waited in between purchases to make sure they were worth the cost. I first dragged my Mum and Nan into a Sephora in LA where they were sold out of all but the Naked Basics. I wasn't planning on buying it but I'm glad I did because it is incredibly useful. I figured that it was small and cheaper and it would be a good indication of whether I would want the other palettes. It was over a full week until I picked up the Naked 1 (HERE) in Times Square, restraining myself from getting the Naked 2 as well. Finally, I gave in and bought the other two because I knew that I would regret not buying them once I got home. I think they will be really pretty and a part of many looks to come. 

Finally there is my (not pictured, sorry about that) Mac Water and Ice Mineralised Eyeshadow (HERE). I stopped for a tiny look in the Mac store at JFK airport on the way home and this was the first thing I touched. It is a shiny silvery blue colour that is way out of my comfort zone but it captivated me in a way no beauty product has before. I threw all caution to the wind and now I have it at home I can see how truly useable it is, I don't think this is the last you will be seeing of this one. 

Lots of Love, 

Shannon xo

Come on over and follow me on Twitter HERE
SHARE:

Saturday, 26 April 2014

A Little Trip To The USA


I spent three weeks travelling around America with my Mum and my Grandma. Here are some of my favourite photos and stories from the trip. 


At Warner Bros Studios we got to sit on the actual couch from Friends!! I was so excited that I had awkward hands and forgot to pull my hair out from behind my ears, but who cares, I was sitting on the same couch as Jennifer Aniston. That plus seeing where they filmed one of my other all time favourites Gilmore Girls made our tour one of the best experiences of the trip. 


At Epcot in Disney World they are holding a beautiful flower show with adorable topiaries of different Disney characters. As a teenage girl you wouldn't think topiaries would be my thing, but in the sunshine with all of the giggling children dressed as princesses in the background, it was quite stunning. 


When at Disney World what is the first thing you do? Go to Starbucks of course! As we were getting some breakfast my Nan saw people being escorted around with security guards and presumed they were famous. I went running out onto the street to see these presumed famous people (as you do) and found a parade going past with Donald Duck waving right at me. I never did find those people though...


The resort that we stayed in at Disney World was filled with these 4+ storey high statues. They were so amazing that we didn't need to walk more than 3 metres from our door to feel Disney's magic. 


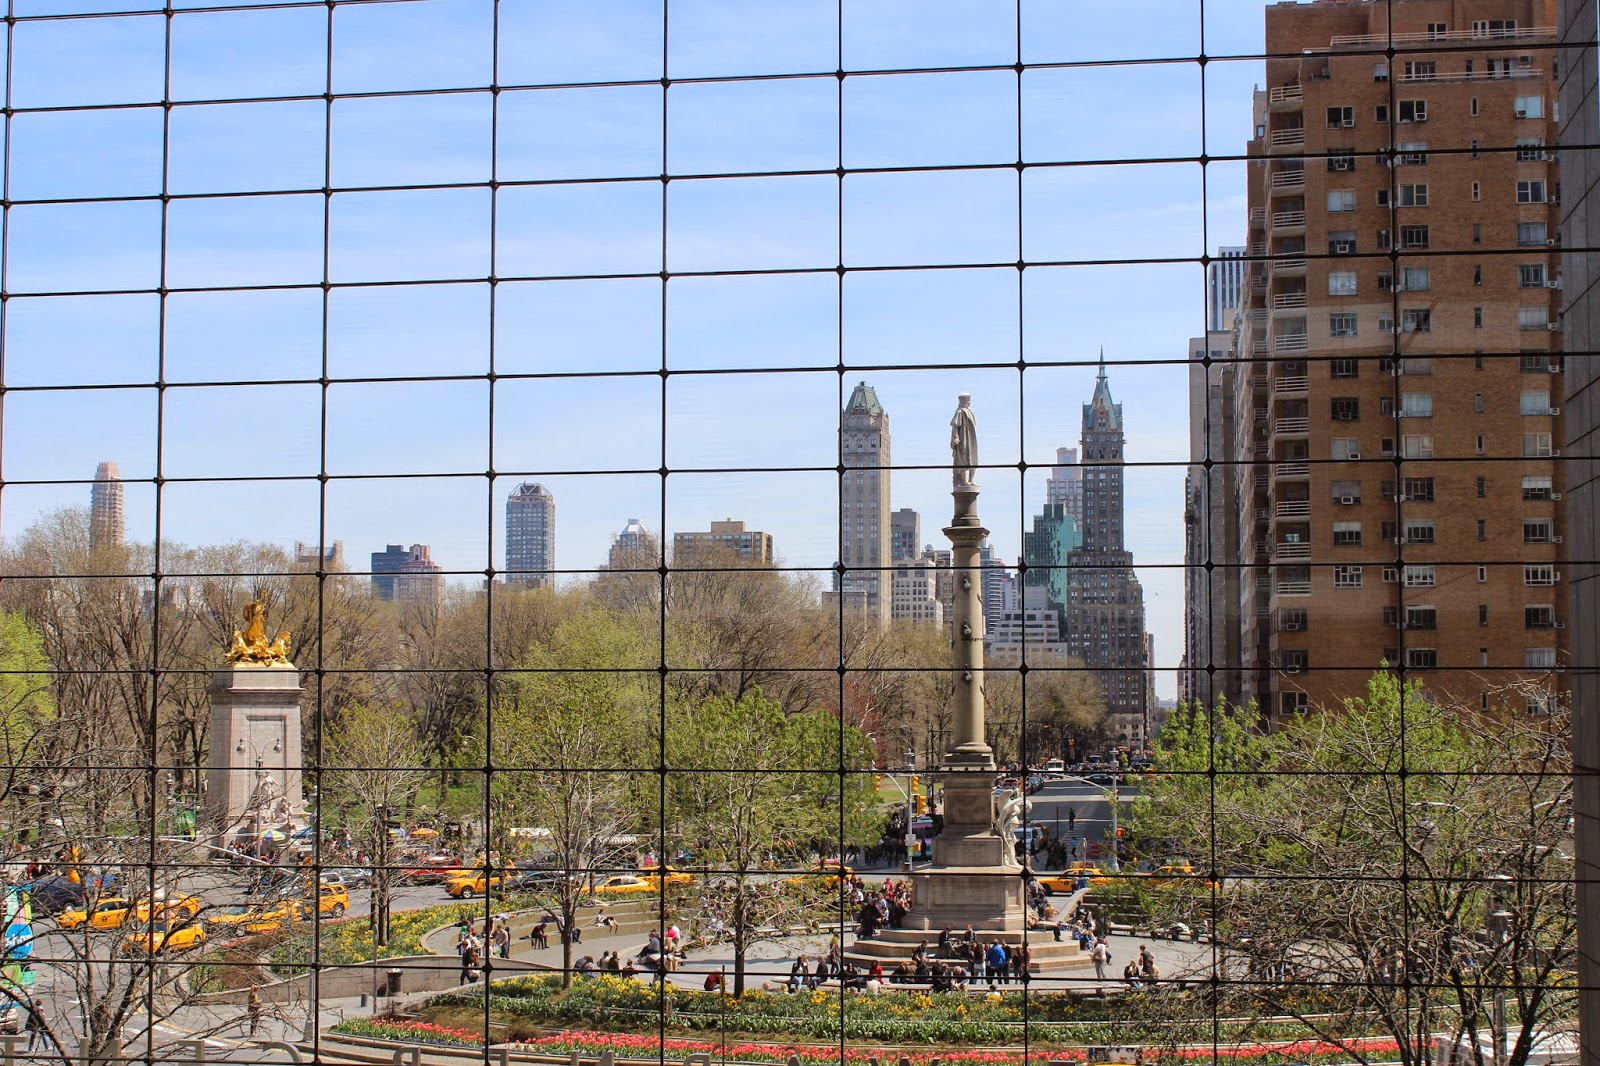
I love this photo of Columbus Square in New York not only because it is very pretty but because I know that behind me was a Sephora. I really liked Sephora.  


Our old next door neighbour who now lives in New York and her husband showed us around Central Park on our last day. It was a perfect last activity because we got to see the park and lots of the city while chatting and catching up with them. 

This was almost pretty enough to make me forget that nights before my Mum met Jason Sudeikis and Olivia Wilde while I was in the bathroom after seeing the play Of Mice and Men. I was really angry about that because I just kept missing all of the famous people! 

It was a fabulous trip and I'm really looking forward to going back to the USA one day to see heaps more.

Lots of Love, 

Shannon xo


SHARE:

Thursday, 24 April 2014

Holiday Cooking: ANZAC Biscuits


Before I jump into the recipe, I feel that I should explain what ANZAC Day is and why we eat these specific biscuits in celebration of said day. ANZAC stands for Australia New Zealand Army Corps and we celebrate the day our soldiers (or diggers as they're fondly known) landed at Gallipoli in WW1. This was our biggest battle and we lost a lot of men, therefore we remember them on April 25th. ANZAC biscuits were developed by the diggers wives and mothers back home who wanted to find a sweet treat that wouldn't spoil in the long mail journey to Europe. These delicious biscuits do not contain eggs, so they stay fresh for longer, and they are more nutritious than your average biscuit with the inclusion of the oats. Now you know the history, I shall share the recipe. 

Ingredients: 

1 1/2 cups Rolled Oats
- 1 1/2 cups Desiccated Coconut 
1 1/2 cups Plain Flour
- 1 cup Brown Sugar
- 185g Chopped Butter
- 1/4 cup Golden Syrup 
- 1 1/2 tsp Bicarbonate Soda 

Method: 

1. Preheat oven to 180°C/160°C fan-forced. Line 2 baking trays with baking paper.

2. Combine oats, coconut, flour and sugar in a large bowl. Make a well in the centre. Place butter, syrup and 1/4 cup cold water in a saucepan over medium heat. Stir for 4 to 5 minutes or until butter has melted. Remove from heat. Stir in bicarbonate of soda. Stir butter mixture into oat mixture.

3. Using 1/4 cup mixture per ball, roll mixture into 12 balls. Place 2 balls, 10cm apart, on each prepared tray. Using the palm of your hand, flatten each ball into a 1cm-thick, 8cm (diameter) round. Bake for 17 to 18 minutes or until golden. Stand on trays for 5 minutes. Transfer to a wire rack to cool. Repeat process with remaining mixture. 


Lots of Love, 

Shannon xo

Follow me on Twitter HERE and tell me below if you make these at home! 
SHARE:

Saturday, 19 April 2014

Holiday Cooking: Easter


When I was trying to find a chocolatey Easter treat I was looking for something with real wow factor. I scoured pages and pages of chocolate creations: easter baskets made from tempered chocolate filled with home made filled eggs, easter bunnies crafted out of modeling chocolate and chocolate filled molten chocolate puddings. I got so caught up in these masterpieces that I could never recreate to their full glory that I almost missed what was right in front of my. My signature dish if you will. Classic, delicious and easy chocolate brownies. Take my word for it, this is the best recipe you will ever try. 

Ingredients: 

  • 90g Milk Chocolate Chips
  • 25g Butter
  • 150g Plain Flour 
  • 15g Cocoa 
  • 1/2 tsp Baking Powder
  • Pinch of Salt 
  • 2 Eggs 
  • 300g Brown Sugar (I know it sounds like a heap, but it’s what gives the fudgy texture and yummy flavor) 
  • 1/4 tsp of Vanilla Extract 

Method: 

Before you start make sure you pre-heat your oven to 180 degrees celsius! 

  1. Put chocolate chips and chopped up butter into a microwave proof container and microwave in 30 second bursts, stirring after every round, until melted and shiny. This should take somewhere between 60 and 90 seconds depending on the microwave and the temperature of ingredients. Once it is melted, set it aside to cool. 
  2. Combine sieved flour, cocoa, baking powder and salt in a bowl and set aside. 
  3. Crack the eggs into a small bowl and whisk together lightly with a fork (this step can be skipped if you are confident that you won’t get any shell into the mixture)
  4. Pour eggs into a bowl with the sugar and vanilla extract and combine with a wooden spoon. 
  5. Mix all three of the separate components together. I usually start by combining the wet chocolate and egg mixtures together and then adding them to the dry flour one but you can do it however you see fit. 
  6. Pour the batter into a lined and greased slice pan and cook for 20-25 minutes in the oven.*

*****MAJOR TIP: Though I make them all the time, I still stuff these brownies up sometimes by being an eager beaver who loves warm baked goods. You need to leave the brownies in the pan until they cool completely, preferably overnight or for a good few hours. If you don’t do this it will fall apart into a big hot greasy mess when you’re trying to turn it out and you will cry. 

These brownies are my favourite thing ever and I highly suggest you try them yourself. If you do make sure you comment or tweet me to tell me how it goes! 

Lots of Love, 


Shannon xo

Follow me on Twitter HERE
SHARE:

Thursday, 17 April 2014

The 123 Perfect CC Cream


Guys, I think I’ve found a winner. I have tried a few BB Creams and Tinted Moisturisers in my time (admittedly no high end ones but many drug store ones) and I think I have found the best. The first hurdle I had to jump in finding this fantastic base was that it is a CC Cream the last thing I need is another type of base to confuse me. I know that CC stands for Colour Correct but I still don’t see the big difference between the three. Are they not all supposed to be light bases that do good for the skin? 

No matter what Bourjois decided to name this product, I can’t get enough of it. The 123 Perfect CC Cream is my new everyday staple. What I like to do is squeeze a bit out onto the back of my hand and then apply it with my Real Techniques Buffing Brush to ensure that I get a nice even coverage and that I won't get my fingers dirty. If you're into using your fingers, it blends in nicely that way as well. It is light, so I know it is not perfect for everyone, but as a girl who is still in high school I try to avoid full coverage bases so that I don’t look overdone (plus I do not have the time or energy to fuss around with those things in the mornings). 

It claims to have three pigments for colour correction: apricot for anti-fatigue, green for anti-redness and white for anti-dark spots. For the light coverage it has I think the pigments do a great job at covering up any discolouration or redness. My skin around my nose can get really red and I find that the CC Cream alone can cover most of it, though I do need to add concealer to spots and pimples. The staying power is pretty good but not fantastic. It does wear throughout the day and if I am doing anything after school I tend to reapply. One thing I can do is reapply the new layer right over the old because it is so light that it doesn’t look caked on with another layer on top (I obviously can’t do this if I have powdered during the day, things can get swampy then). 

Pros: Easy to work with, light coverage that covers redness, sets nicely without the need for a powder. 

Cons: Watch out when the tube is fresh because the runny consistency means it comes out without much force and you end up with far more than you need. Waisting a good product is never okay. 

Lots of Love, 


Shannon xo

Not to sound needy but please please please follow me on Twitter! (Click HERE)
SHARE:

Wednesday, 9 April 2014

My Travel Makeup Bag


As you are reading this I am somewhere in America living out of a suitcase (I'm writing this early because I'm organised like that). Though I have limited the amount of clothes I've brought, I still needed to bring plenty of options on the makeup front. I'm going to list the items from my makeup bag and give you a brief reasoning for why I have brought them. Is that okay with you? I hope so because it's happening, and it's probably going to be long.  


Starting with the face products I have: 

Bourjois Happy Light Matte Serum Primer: As I have metioned before, I don't really think this does much other than making my foundation go on smoothly, it doesn't have any great effect on my pores and it doesn't make my makeup stay on very much longer. That being said I've become quite committed to using it under my heavier coverage foundation, so I figured I would bring it along. 

Rimmel Match Perfection Foundation: I need a proper foundation for when I feel like going a bit fancier with my makeup. I will most likely wear this out for dinner, to one of the Broadway shows or if my skin goes a little cray and needs something more. 

Bourjois 123 Perfect CC Cream: This is my go to base for day to day and that will stay the same no matter what country I'm in. 

Bourjois Happy Light Concealer: We all have something to hide. 

Rimmel Stay Matte Powder: I don't always need this with the CC Cream but I will need it for the Match Perfection and since it's going to be quite warm in Florida I may need to touch up throughout the day. 

Clinique True Bonze Pressed Powder Bronzer: It's tiny and works really well with my skin tone to warm up my complexion when my foundation gets wishy-washy.


Moving onto the eyes I have: 

Revlon Eyelash Curlers: A must have for a girl with short straight eyelashes like mine. 

Covergirl Clump Crusher Mascara + Revlon Grow Luscious Mascara: I won't leave the house without some mascara to give my invisible eyelashes some life. 

Maybelline Color Tatoo in Bad to the Bronze: If I want something a bit dramatic on my eye, or I want a good base for my eyeshadow to stay all day, I will throw this on with my finger. 

Clinique Eyeshadow Quad: You know I use this all the time, it's the perfect tiny set. 

Maybelline Master Precise Liquid Eyeliner: I wear liquid liner most days because it really adds an interesting dimension to my face and I'm kind of proud that I can apply it. 

Designer Brands Kohl Liner: I will use this for my waterline when I am feeling daring. 


I always need plenty of lip options: 

Lucas' Papaw Ointment: For when my lips are feeling tired and sad. 

Revlon Lip Butter in Sugar Frosting: This is my every day lip product that I (and my Mum, she's already on to her second one) couldn't live without. 

Revlon Lip Butter in Candy Apple: If I want to give things a red tinge. 

Chanel Rouge Allure in Surprenante: a) It's like my child and I could not leave my child behind b) It's really wearable. 

Nyx Butter Gloss in Eclair: If I'm feeling glossy. 

Revlon Colorburst Matte Balm in Unapologetic: When I want to unapologetically blind people with my crazy bright kissers. 


A girl needs her brushes: 

Revlon Powder Brush: I use this for bronzer/powder. 

Real Techniques Face Brush Set: Powder, contouring, foundation and concealer all in three brushes. 

Real Techniques Eye Brush Set: I wouldn't bring them ALL but since I'm planning on buying the Naked Palette I need some tools so that I can play with it. 


And finally the extras: 

Gap Bright Perfume: This is a great everyday scent that I'm not paranoid about breaking or losing because it's not crazy expencive. Win win. 

Estee Lauder Automatic Pencil for Brows: I need to make them visible. 

Wowee if you stuck with me through that whole post, claps for you because it was a long one! You were warned though. 

Lots of Love, 

Shannon xo 

Follow me on Twitter HERE
SHARE:
© Lots of Love, Shannon. All rights reserved.
BLOGGER TEMPLATE DESIGNED BY pipdig